Sunday, 19 December 2021

December Update

It's been a while since I last posted, but things haven't been completely idle on the Salmon Run & Robson Landing Railway or its subsidiary, Salmon Run Lumber Co. Here, in no particular chronological order are the newest developments.

First, an early Christmas present to Salmon Run Lumber, a new diesel engine, Bachmann's Whitcomb 50-ton Center Cab. Here it is with Salmon Run Lumber markings as engine #28, and yes, it has the sound module. BTW, I produce my own decals using a laser printer and blank decal sheets. Does it run well? Oh, yes and it sounds perfect, thanks to twin speakers, one on each end. I was surprised that the entire shell as well as the railings are all metal. That gives it a heft unmatched by any other of my engines, save perhaps my Baldwin 2-8-0, the biggest hauler on the layout. Truly a well-running, attractive addition to the roster.


Then, three new structures, two scratchbuilt, one a kit from the incomparable Bar Mills Models.

First up, I needed a small office shack for the team track at Robson Landing South and designed one to fit the small space available. It is entirely build of wood, except for the Grandt Line windows and door.

Salmon Run Lumber Camp #1 has been without a proper water tower since its inception and the other day, I finally decided to build one using my latest tool, a Proxxon miter saw. It made cutting the dimensional lumber to precise lengths time after time a snap. All is scratchbuilt, even the spout.

Finally, the Bar Mills Models kit, one of two I received last month -- Old Man Harts. I built it as a semi derelict storage building for Salmon Run Lumber Camp #1 and you can see a bit of it to the right of the water tower above. Constructing and weathering it as an unloved, abandoned place taught me new techniques. The hobos using it seem happy that the lumber company men aren't around to roust them.

I placed both the water tower and the storage shed on a sheet of foam core board with a section of track that connects to the rest of the lumber camp, so it is, in effect, a diorama that hosts a working spur. Doing the scenery work on my worktable rather than the layout gave me the chance to really build it up. And since it's not fastened down yet, I can always take that section down and add more until I get to the point of doing the scenery around it. The photos really don't do the depth of field and details justice. I can't think I'd get the same effect in HO, which is part of why I moved to On30.

Up next? The other Bar Mills Models kit I got last month, The Gravely Building. It will be the last of the big buildings because I'm running out of space. But I have a few smaller ones dating back to my first forays into O scale scratchbuilding which need replacing.

Since this is likely my last post of 2021, a very Merry Christmas to all and a Happy New Year. Keep railroading!


Monday, 9 August 2021

Logging Camp Nights

 Years ago, during my early forays into On30, I bought a full set of six Bachmann logging camp cars, now long out of production, sadly. They've been sitting on dedicated spurs at Camp #1 for years, collecting dust and spiderwebs while I worked on other parts of the layout. But in recent days, I've begun adding to the nighttime lighting at the camp by finishing the scratchbuilt main office, which will sit beside the engine shed and turntable. That made me wonder about lighting the interior of the camp cars, so that I could have a completed nighttime scene. It stands to reason that after dark, the loggers would be in the cars, eating, playing cards and generally relaxing. And so, I devised a plan to illuminate them with soft, incandescent bulbs that would best mimic the oil lamps that would have been common in the day, using track power so they could still be moved as necessary.

The solution turned out to be simplicity itself. Like the Bachmann cabooses and passenger cars, the trucks had insulted wheels at one end of the axle, meaning I could use the axles themselves are a way of shunting power from the tracks to the light bulbs. I just had to make sure the front and rear truck insulated wheels were on opposite sides.

After painting the interior of the cars black, so that the walls don't glow and the only light comes through the windows, I made simple wipers from strips of brass and popped them into place with the middle over the bolster and the ends under the axles. Since the wipers can't be seen by onlookers, I didn't need to worry about appearance, only function. After that, I drilled a hole through the car's floor, ran the bulb wires through, soldered one to the front truck wiper and one to the rear truck wiper and voila. Double sided tape holds the bulb in place in the middle of the car. The image below shows the underside of a completed car and the inside of the next in line to be wired up.


Though the cars will never be moved by anything else than the great big hand, the axles can still turn if necessary. So far, I've done two of the six and the light streaming through their little windows really adds to the scene. I just have to remember that the tracks they sit on need major cleaning, as do their axles before I install the power pickup strips.

It's such an easy project, I wonder why I didn't do it before.

Sunday, 1 August 2021

The Latest Scratchbuild

 I haven't posted much lately because, with summer being here, I haven't done much on the layout. But I did finish a scratch built background building I've been wanting to make earlier today and fill in a gap between two structures. As with all my buildings, it's lit on the inside, and the the sign on the roof, a Woodland Scenics HO scale product, is also lit. The structure is built from Evergreen Scale Models styrene board and batten sheets and dimensional styrene pieces. The roof details are Walthers HO scale and the "Trost Paint and Oil Corporation" sign is from a City Classics assortment of HO scale signs. Dimensions are 48 scale feet wide by 11 scale feet deep and 20 scale feet high. It's just big enough to give a sense of presence. Yes, I'm using a lot of HO scale components, but since this is a narrow gauge railway, many O scale components would seem oversized. Besides, my local hobby shop doesn't carry O scale. Eventually, I'll get around to taking nighttime shots and you'll notice a reddish-orange glow in the window to the right from an open furnace door.


Tuesday, 25 May 2021

A Tale of Three Critters


One of the many delights of On30 is the almost endless parade of ‘critters’ an enthusiastic modeler can build. There’s just one problem, a short wheelbase in On30 isn’t much longer than a short wheelbase on HO, and since we use HO tracks, reliable running is an elusive goal. Fortunately, there are solutions. Years ago, I bought a Bachmann Porter and two Davenports, none of which ran particularly well because of power pickup issues. I eventually overcame the problems on all three by using a secret weapon: Bachmann’s On30 passenger car trucks. These trucks are built to pick up power on one side and illuminate the cars using two of them – not particularly reliable either, but that’s a different story. By using a small square of PC board, a length of bronze phosphorus rod and some solder, it’s easy to transform said truck into a reliable four wheel power pickup, and therein lay the solution to short wheelbase critters.

#3 — A Porter Transformed.

This one started out life as an 0-4-2, but a failed experiment lengthening its wheelbase with a Backwoods Miniatures conversion kit (let’s just say I’m no good soldering brass parts together) left with an 0-4-0, a non working, non sound decoder and nowhere to go. That’s when I discovered the magic of TCS WOW steam sound decoders with Keep Alive. But to use it, I would need a tender for my critter. So, I scratch built one large enough for the decoder, the keep alive, and a speaker. A fresh paint job, some extra details and an engineer, that Porter became one of my best sounding, best looking and most reliable switchers, one which simply doesn’t stall over turnouts or bits of dirty track.


#1 — A Davenport Steamer.

The first Davenport to receive a critter treatment turned the gas-mechanical into a steamer thanks to a Backwoods Miniatures conversion kit I could actually manage because it was made of resin. And this time around, I built a tender with a passenger truck fitted with four wheel pickup right away to house the decoder and give it some more oomph. I haven’t yet put a TCS WOW Keep Alive sound decoder in it for reasons that escape me, but it has a non-sound TCS decoder and runs decently – not as well as #3, but in part, that’s on the mechanism itself which seems to bind every so often. This rebuild left me with a Davenport shell, which is important for my third critter’s story.


#86 — A Davenport Cow & Calf

The second Davenport sat on a siding, unused for several years until the bug to have a properly working, sound-equipped engine that wasn’t steam on the layout. I have one upconverted diesel, a Bachmann S2 transformed into On30 with a Boulder Valley Models kit (sadly, the company shut down in 2016), but I couldn’t figure out how to fit a sound decoder and speaker inside its shell. So, while it looks nice and runs smoothly, it also runs silently, and with most almost all of the engines on the layout making prototypical noises, it’s the odd one out. Anyway, back to my third critter.

Using my experience gained building a pair of decoder and speaker bearing tenders, I fitted my last remaining passenger truck so it picked up power on all four wheels, then built a platform over it and, using the engine part of the Davenport shell left over from the previous conversion, I created a calf using styrene and details from my parts box. This one was fitted with a TCS WOW diesel sound decoder with Keep Alive. Yes, I know, it’s a gas-mechanical not a diesel, but since I’m running an imaginary railway in an imaginary gauge, I can pretty much do as I please.

As usual, the decoder and sound quality are top-notch. Sure, I didn’t do much to the cow except add horns and a bell, leaving it green, the way it came from the factory. Perhaps at some point, I might paint it yellow like the calf, but for now, the story is that the calf was created from a yellow-colored switcher and the shop couldn’t find any green paint on the island, which isn’t far from the truth. I have no green paint close enough to the factory shade in my inventory and can’t get my hands on any for a while. I think it looks kind of neat, actually. 


Conclusion

Now here’s the kicker – the #86 Davenport cow and calf combo, along with reworked Porter #3 described above — are my most reliable movers, better than my larger (and more expensive) Bachmann Climax or Shay, let alone the road engines, my Bachman 2-8-0 and 2-6-0.

I ran both #3 and #86 at the slowest speed I dared, all the way from the logging camp on the upper level to the Robson Landing station, which encompasses most of the distance on the layout, and it took almost 30 minutes to cover a distance my Climax will do in five or six because if I run it too slow, it’ll stall.

The little critters never hesitated, stuttered, let alone stalled. I ran them back up to the logging camp with a load of cars while watching tv shows. Same thing. And back down again, still perfect, all the while burbling or chuffing along happily, bells ringing and horn or steam whistles tooting whenever I got up during ads to work the throttle. I’ve dreamed of reliable, slow-running engines with light and sound for a long time. All it took to make my dreams come true where a few Bachmann critters, some passenger car trucks, some TCS sound decoders and a little scratch building.

Monday, 24 May 2021

It's in the Mail

Even though I haven't posted in a while, work on the layout has continued. For one thing, it's almost completely illuminated by now, except for a few spots at the main logging camp. Come nighttime, when I turn out the basement lights, the effect is magical. Now I only need to figure a way of gently illuminating my DCC throttles.

One of my latest builds is Bar Mills Models' REA Depot at Cranberry in O scale. But since I model a fictitious logging line on the northeast coast of Canada's Vancouver Island, and REA doesn't operate in Canada, I made a few minor signage changes. Instead, it's now a Royal Mail Canada depot circa 1949, complete with the old Red Ensign flying from a flagpole.


This model had a few tricky moments, in particular the complex roof. Each of the four doors has a working Woodland Scenics LED light above it, as you can see above the freight door.

Another nice little scene I completed was Helwig's Grinding Service. The shacks in the image aren't new builds but rather old ones that got a new lease on life and a scenicked setting. Also from Bar Mills Models, the Shack Pack comes with three little structures. One of them found a home beside the Robson Landing water tower. The other two, along with an HO scale shed I up-scaled to O (the one on the right), became Helwig's. The rusty water tank is from Walthers' HO tank assortment pack, the light on the pole is scratchbuilt and works, you can even see a bird at its top; the fencing is from Woodland Scenics as are the figures. The cardboard cutout backdrop building has migrated through several HO layouts over the past quarter century before finding what I hope is its forever home here.


I'm currently finishing a 'critter' involving a Bachmann On30 Davenport. When I'm satisfied that it's photo-ready, I'll post it.

Saturday, 20 March 2021

Infill

 I've been remiss in posting my latest work, but here's a bit. First, Zimmerman Printing Company, a scratchbuilt project with basswood sheets and dimensional lumber from Northeastern Scale Lumber Co., Grandt Line windows, Walthers HO Roof Details (which look amazingly well sized for O scale!) and Woodland Scenics figures. The interior is detailed and lit, so that at night, the observer discovers new scenes behind the windows and doors.


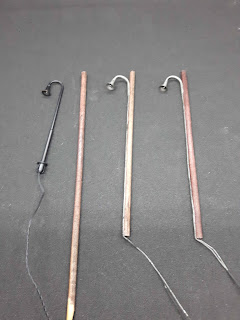
And speaking of detailed and lit, I've embarked on a project to light up the entire layout with interior lights, lampposts, etc. I already had a handful of buildings with detailed and wired interiors, but hadn't installed a power bus to set up a light circuit. That has changed over the last four weeks and about half the layout is now lit, creating an enchanting 1:48 world after dark. It all started with my curiosity about the Woodland Scenics plug and play lighting system, which now lights one quarter of the layout, and evolved into my recycling power packs and lights left over from my previous HO layout. Since HO lights from 10 years ago were terribly oversized for 1:87 scale, it didn't take much to make them fit a 1:48 scale environment, although many of my leftovers have a European flair that doesn't always fit a narrow gauge environment set on the northeast coast of Vancouver Island in the late 1940s. But as I'm becoming more imaginative and skilled, I've converted a number of them to something that fits and lights the scenery perfectly.

Below is my first run at transformation: 3/16" wood dowels turned into telephone posts through distressing and staining, with the top part of a European-style lampposts attached. The image is pre-weathering so they look even better now, installed to light up the yards of Bar Mills Models structures.

As a bonus, I'm working my way through existing structures as I prepare them for interior and exterior lighting, some of which I built years ago and who've either suffered the ravages of time, or weren't that well executed compared to what I now build. I call it my rehabilitation project, and each one comes off the workbench looking much better than before, thanks to repairs, properly executed weathering and glimpses of another world behind windows and doors. Of course, getting my big hands inside small buildings to caulk corners so light doesn't leak out, to retrofit them with interior details and to install the lighting can force me into devising ingenious solutions. In future, I will prepare all new buildings for some level of interior detail and lighting, as I did with Zimmerman Printing Company above, a few weeks ago, starting with the Bar Mills Models "Railway Express Agency" kit in O Scale now on its way from Maine to the Great White North.

One of these days, I'll set my camera gear up to take High Dynamic Range Imaging pictures of the layout lit up for nighttime service. Since I haven't done any HDRI for years, it might take a while, especially if I've lost the software extension to my digital photography program that makes HDRI production possible when I switched desktops PCs in late 2019.


Sunday, 31 January 2021

Bridging the Gap

My latest effort as I continue finishing the kits that are stacked up under the train table, is a timber trestle that I bought at a train show almost a decade ago. It's decking was finished years ago, however, since I didn't need it immediately, it languished in a box until a few weeks ago. Finally, the bridge is not only built, but installed on the layout, with basic (very basic) scenery around it.

The bridge is based on Hunterline's S Scale 81' kit, with scratchbuilt wooden abutments and kitbashed bents. I found the abutments and bents that came with the kit too neat for a hard-luck logging railroad near the end of its life.

The picture below shows Bachmann On30 Climax #6 crossing Black Bear Gap at the head of an empty log car consist, on its way back to Salmon Run Lumber Camp No. 1. The black bear under the bridge is a Woodland Scenics model. The watercar & boxcar behind #6 are scratchbuilt. The area will receive a lot more scenery details as things progress.